ONE LIGHT STUDIO PORTRAIT
This one light portrait, or headshot, of our great model Brenda was made at one of our Beginning Studio Lighting & Posing workshops. There is no retouching, only LR corrections and shadow detail was increased in PS. The background is a painted canvas we use for formal portraits, and can be lit with a background light. During this workshop we “build” the lighting by adding each element one by one. First the main light, then a reflector, then a second light, maybe a color gel, and so on. Of course, you can make a beautiful, well lit portrait using only one light, in a soft box, like in this case, or any other large, diffused light source and a reflector. That’s what this post is about, specifically, the best way to position these 2 light sources (I refer to the reflector as a second light source since it does illuminate the subject) to create a nicely lit portrait. This is a traditional way to use these tools, there are many other ways to use them to create more edgy or creative lighting and different moods.
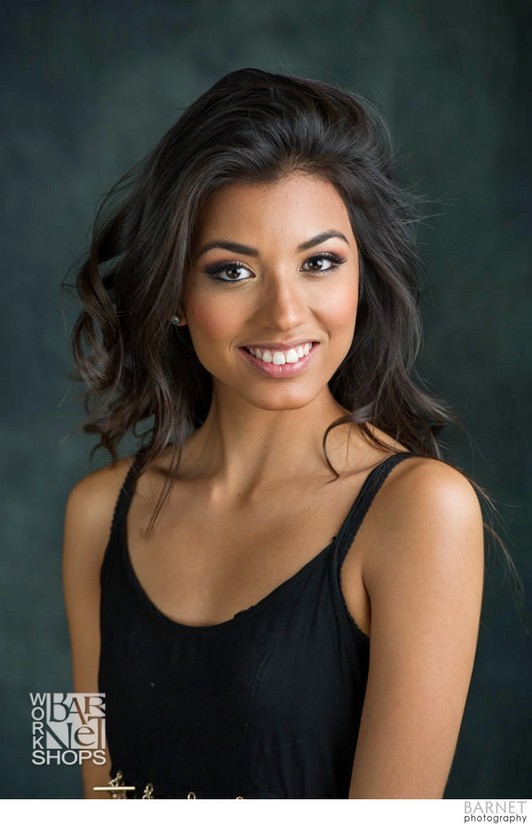
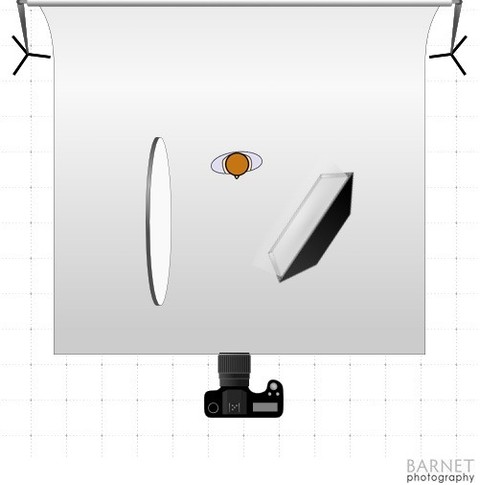
Brenda was lit with a medium Chimera soft box without a grid or egg crate, and a 42″round silver reflector. The diagram directly below shows how many photographers would instinctively position the soft box and reflector. The soft box is aimed right at the subject and the reflector is positioned on the other side, not getting in the way of the camera, to light the opposite side of Brenda’s face. This positioning produces adequate results.
The diagram below is how we lit this "one" light portrait. At first glance it looks pretty much the same as the previous diagram, however, there are subtle but significant differences. The box is not aimed at the subject, it’s “feathering” the subject. Also, the box is closer to the subject, especially the right side of the box. allowing the far end of the box to reach the far side of the subject’s face. This provides more of a “wrap around” effect. We often hear the term “wrap around” lighting, and we all know what it means, but, in my opinion, it’s not an accurate way to describe this effect, because light does not “wrap around”.
Light travels only in a straight line and does not bend or turn corners. What’s happening here is that some of the surface of the box is now actually reaching the far side of the face in a straight line. With less intensity because it’s traveling farther (inverse square law). This provides a smooth and gradual transition from the dark to the light side of the face and nice shadows to show shape and depth. With this soft box placement, especially with a large box, a reflector may not even be needed. The result would be a more dramatic look but there would be detail on the shadow side, especially if there was a white wall near by.
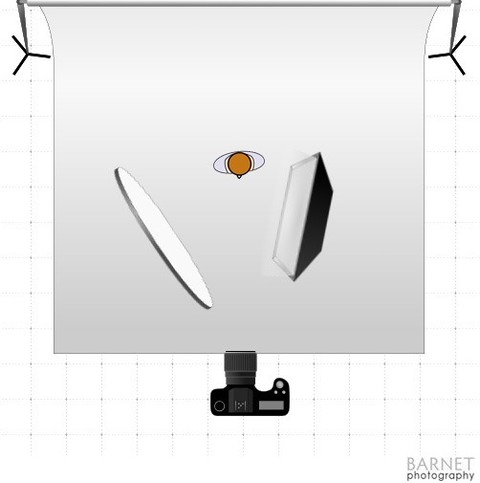
Enter the round 42″silver reflector. These reflectors are very efficient, often too efficient so we can turn them around and use the white side. Here, the silver reflector is placed at an angle, just off camera view to continue the direction of the light, rather than create a different light source on the other side. This gives us a nice transition avoiding a darker area in the center of the face that could result if the positioning of the reflector in the first diagram was used.
The reflector in this lighting set up, silver or white, will determine the contrast and drama of the overall image. If the portrait is to be used in a real estate agent’s brochure it can be more evenly lit. If it’s a portrait to be framed and displayed it can be made more dramatic, and so on.
In our workshops we add other light sources, background light, hair or separation lights, strips, etc.
Note: I like 42" silver / white reflectors, or something along that size, because they're large enough to do the job for 1 or 2 subjects and small enough to use outdoors even on a windy day.
I'm not fond of the 6 or 8 in 1 reflector kits... These are more expensive, heavier, and difficult to set up on location. For outdoor sessions we always bring only 2 reflectors; a 42" silver / white and a 42" translucent. Sometimes we use both at the same time... You can't do that with the 6 in 1 kits.
We hope these TIPS were informative!
Diagrams created with www.lightingdiagrams.com